
Could you donate some?
The original content (日本語) is here.
Disclaimer: A machine Translation is used in this page.
Index of Contents
- About Patch File Formats
- About Banks
- Edit Screen
- Param Screen
- Cart Screen
- Subscreen of the Edit Screen
- Misc window (param)
- About the Multiple Out function
- Frequently Asked Questions
- Supported MIDI Messages
Translated with www.DeepL.com/Translator (free version)
About Patch File Formats
Available patch file formats are Dixie Performance, 1 voice, 32 voices, and 32+1 voices.
Dixie Performance (dxpf) contains a current patch, multi-timbre settings, a work bank, and parameters.
1 voice contains one voice for the current patch. Loading it will immediately change the current patch.
32 voices contains one bank. Loading it changes the work bank.
32+1 voices is a combination of the above two.
About Banks
A set of 32 patches is called a bank. The bank from which files are loaded is “work”, and banks A, B, and C are not often rewritten. Also, banks A, B, and C are synced to iCloud.
Save your favorite patches in bank A, B, and C. The default patches in bank A and B are the same as those in cart’s Factory 1.syx and Factory 2.syx, so you can rewrite them.
Edit Screen
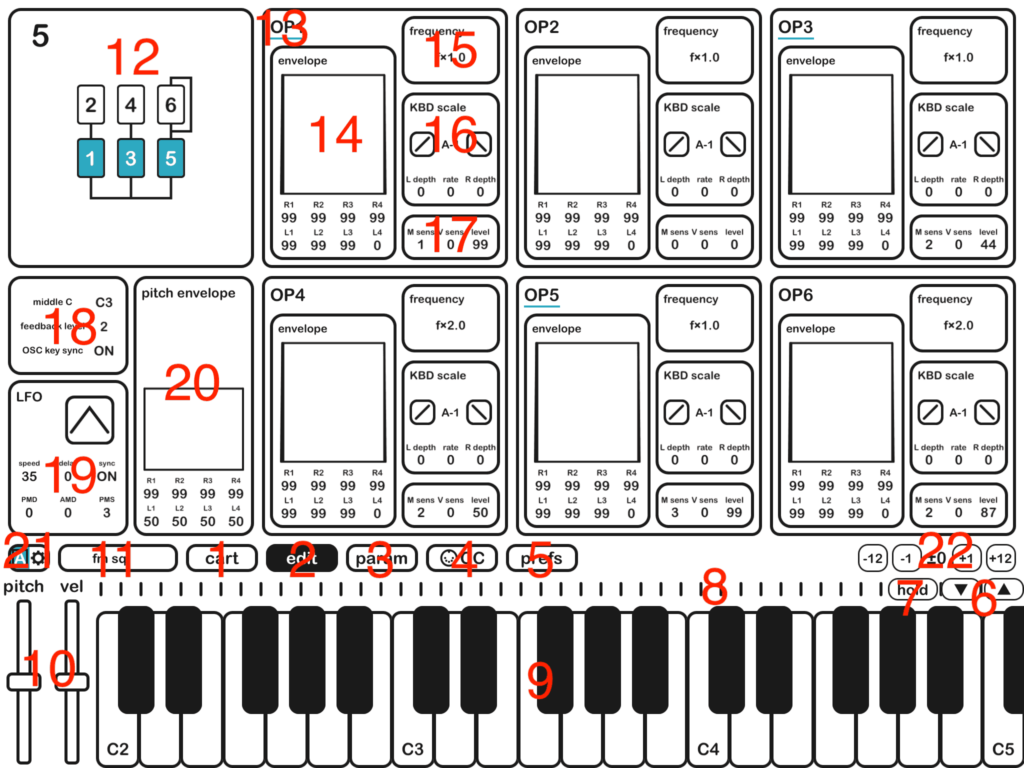
1. Cart button
It will transition to the cart screen.
2. Edit button
Transition to the edit screen.
3. param button
It transitions to the Param screen.
4/ MIDI CC Button
Assign MIDI Control Change. After pressing this, select the function you want to assign, and move the knob on the MIDI controller, or manually specify the CC number.
5. Setup button
Make settings for your app. You can set device connection settings, buffer size, polyphony, background audio, auto sleep, and themes.
6. Keyboard Zoom/Shrink button
Tap to enlarge/shrink the keyboard.
7. Hold button
When enabled, the keyboard locks when pressed and is pressed all the way.
8. Scrollbar
You can drag the left or right to move the range of the keyboard.
9. Keyboard
Tap to hear a sound.
10. Pitch bend/velocity slider/modulation wheel
Drag “pitch” to move the interval in the range of pitch range. The slider on the right is the Velocity slider for Vel, and the modulation wheel for mod. When you drag “vel”, the velocity changes when you tap the keyboard.Double-tap resets to 64. When you drag “mod”, the controller setting in the function parameter of the Param screen takes some effect.
10. Instrument buttons
Displays the tone name. Tap to display the patch select screen.
11. Algorithm
Displays the algorithm and output level. Tap to display the algorithm settings.
12. Operator on off
Displays the number and output level of each operator. Tap to turn the operator on or off.
13. Envelope
Displays the envelope. An envelope represents a change, such as a volume. Generally, the volume of each operator changes as shown in the graph. Tap to display the envelope settings.
14. Frequency (Frequency)
Displays the frequency of the operator. The frequency setting is displayed when tapping. If the mode is ratio, it will appear like “f×1.0 + 4”. This means that the frequency is 1.0 times the given frequency and that the Detune is + 4. If the mode is fixed, it will appear like “100.0 Hz”.
15. Keyboard scales (KBD scale)
The ability to change the volume and speed of the envelope depending on the keyboard being pressed. See keyboard scale settings for more information.
16. Sense/Level
Amplitude modulation sensitivity, key velocity sensitivity, output level is displayed. See Sense/Level settings for more information.
17. Other
Middle C transpose, feedback level, show oscillator key synchronization. See other settings for more information.
18. Lfo
Displays the status of the LFO (Low frequency oscillator). See the LFO setting for more information.
19. Pitch Envelope
Displays the envelope of the interval change since the keyboard is pressed. 50 is the standard pitch. Tap to display the envelope settings.
21. Multi-Timbre bar
Switch between multiple timbres. When you tap in the selected state, the sound toggles.
If you tap the right gear, you can set up it.
22. Transpose bar
Transposition can be set for each timbre in semitone steps. In the +1 state, pressing the C key on the keyboard produces the C# note, which is one semitone higher. 1 octave is 12 semitones.
Multi-Timbre setting
Copy the Current Timbre
Copies the currently selected timbre to another timbre.
Number of Timbres
The number of tones.
Unison
The pitch is staggered to make the sound thicker. You can set the number of layers per timbre.
Unison Spread
Specifies the amount to stagger the pitch in unison.
Set 16 channel multitimbre
In one action, make the number of timbres 16 and assign each channel.
Channel
Specifies the receive channel. Can be set for each timbre.
Mode
You can specify the mode for each parameter.
- Same Channel: The channel-matched timbre has the same parameters.
- Independent (When Selected): The parameters are independent of each timbre. When you receive a MIDI signal, it changes only when the timbre is active.
- Shared (Always): Parameters are common to all timbres.
Param Screen
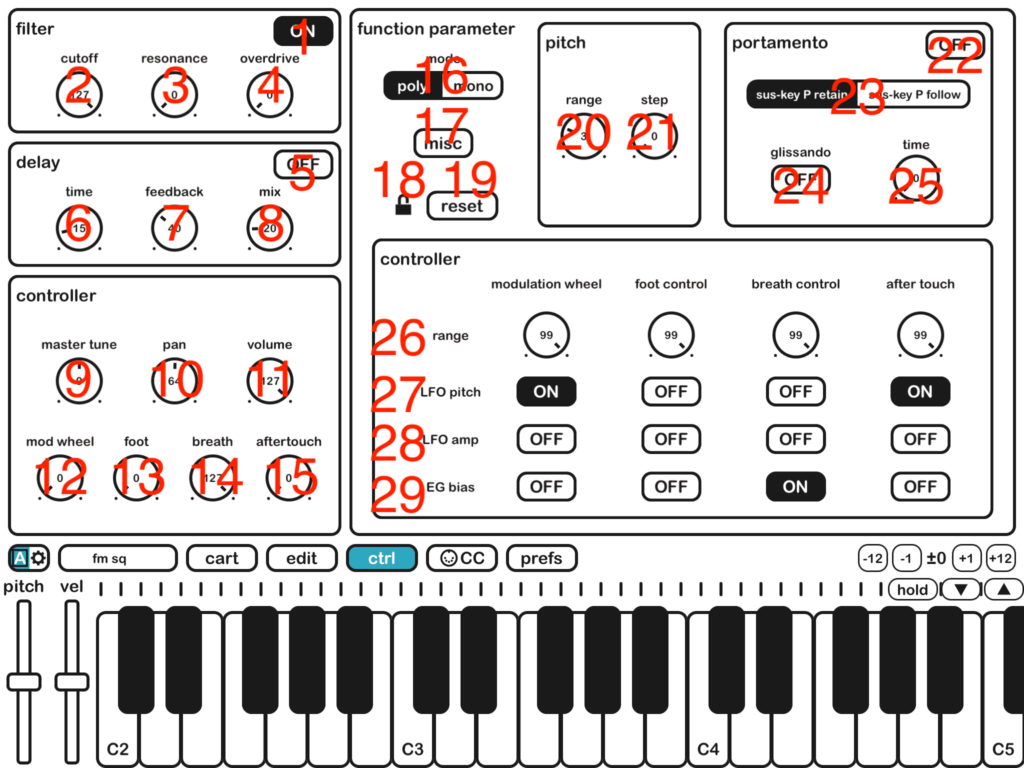
1. Filter On
Enable/Disable the lowpass filter.
2. Filter cutoff
Sets the cutoff frequency for the lowpass filter. Sounds higher than this frequency will be cut. CC # 74.
3. Filter resonance
Sets the resonance intensity of the low-pass filter. The sound around the cutoff frequency is emphasized. CC # 71.
4. Filter Overdrive
Set the strength of the overdrive. The sound is distorted when it is enlarged. CC # 92.
5. Delay On
Enable/Disable the delay effector.
6. Delay Time
Set the time for the delay. The unit is 10ms. CC # 12.
7. Delay Feedback
Set the delay feedback amount. The larger the delay, the less the Echo will be. CC # 91.
8. Delay Mix
Set the volume of the delay. Zero disables the delay. CC # 94.
9. Master Tune
The tuning of the interval can be finely set. The range is ± 75 cents. Double tap to zero.
10. Pan
Sets the left and right orientation of the speaker. The leftmost is 0, the center is 64, and the rightmost is 127. Double tap makes the middle 64. CC # 10.
11. Volume
Set the volume. CC # 7.
12. Mod Wheel
Represents the state of the Modulation Wheel (CC # 1).
13. Foot
Represents the state of the Foot Controller (CC # 4).
14. Breath
Represents the state of the Breath controller (CC # 2).
15. Aftertouch
Represents the state of the Channel Aftertouch controller.
16. Poly/Mono Mode
Switch between poly mode and mono mode. In poly mode, you can output more than one sound. In mono mode, only one sound is output at a time. Depending on the mode, the Portamento will change.
17. Misc button
Opens a window to configure velocity curve, breath to velocity, and smooth control.
18. Lock button
Lock the settings of this screen. The settings are not rewritten by loading a file when locked.
19. Reset button
Resets all settings on this screen to their default values.
20. Pitch Range
Sets the range of pitch bends. 0 does not take a pitch bend, with 1 half-width and 12-octave range.
21. Pitch step
If nonzero, the pitch is changed in units of this value when the pitches bend is moved. One in a semitone, twelve in one octave. If this value is nonzero, the pitch range is fixed at 12.
22. Portamento on Off
Turn Portamento on or off.
23. Portamento mode
In poly mode, Sus-key p retain and Sus-key p follow, mono mode has a fingered and full time mode. In Sus-key P retain, the pitch of the sound with the keyboard turned off is unchanged, and the portamento from the pitch of the keyboard pressed just before toward the pitch of the newly pressed keyboard. In Sus-ket P follow, the pitch of the sound with the keyboard turned off is portamento toward the pitch of the newly pressed keyboard. The pitch of the sound with the keyboard pressed does not change. In fingered, it only takes a portamento to play legato (play the next keyboard while holding a certain keyboard). Full time always takes a portamento.
24. Glissando
When turned on, it will take glissando instead of Portamento.
25. Portamento Time
Portamento set the speed. Portamento at 0 and slowest at 99.
26. Controller Range
Sets the size of the modulation wheel (CC # 1), foot Controller (CC # 4), Breath Controller (CC # 2), and after-touch effect. 0 does not take effect, and 99 is the most effective.
27. Controller pitch
Toggles whether or not to control the interval change in the LFO. When the LFO setting pitch mod sens is 0, it does not take effect.
28. Controller amplitude
Toggles whether the LFO controls the volume change. If the amp mod sens of the Sense/level setting is 0, it does not take effect.
29. Controller EG Bias
Changes the volume of the envelope. If the amp mod sens of the Sense/level setting is 0, it does not take effect. It becomes the brilliance effect when put on the modulator, and becomes the volume effect when putting it on the carrier. If EG bias is enabled and the amp mod sens of the carrier is the maximum and the controller is minimal, there may be no sound.
Cart Screen
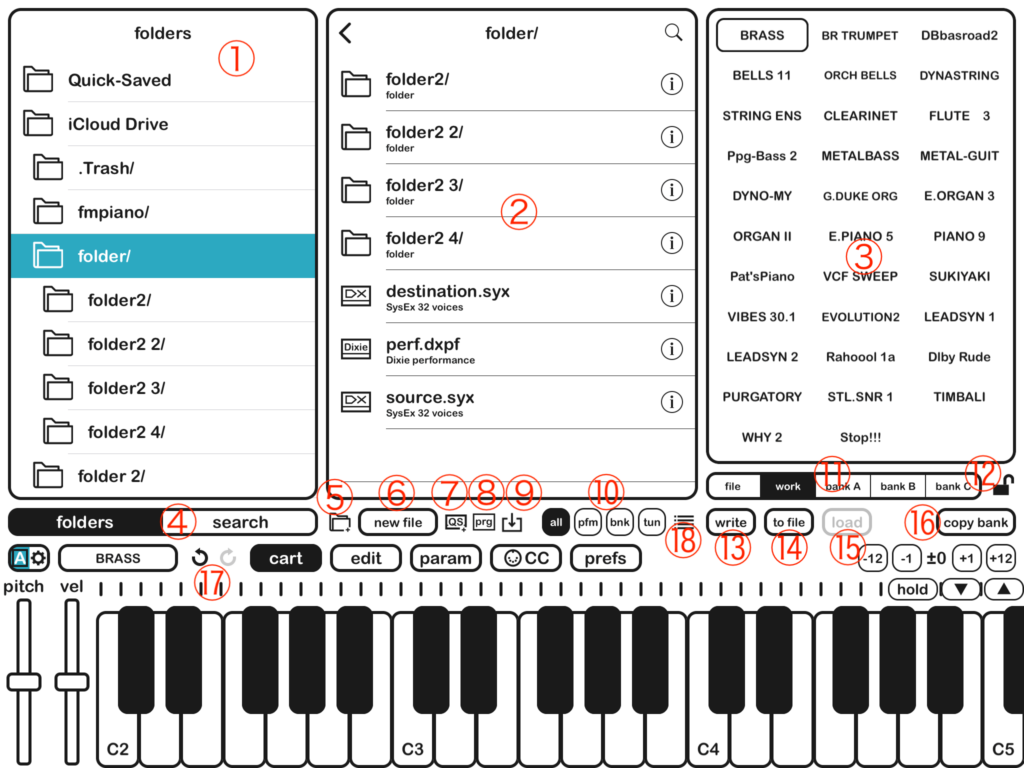
1. Folder pane
Displays a list of folders.
2. File pane
Displays a list of files.
3. Patch pane
Displays a list of currently loaded patches. You can tap to load a sound. When the “write” button is enabled, tapping will save the sound to that location.
4. Folder/Search Toggle
Switches between folder view and search screen.
5. Create New Folder Button
Creates a new folder.
6. Create New Cartridge Button (new file)
Saves the current state in the selected format.
7. Quick Save Button
Quick saves the current state. You can select the data format to save in the settings screen.
8. Program Map Button
Opens the Program Map screen.
9. Import Button
Imports files from external sources.
10. File Filter
Displays only files of the specified type. “all” shows all files, “pfm” shows performance files, “bnk” shows sound files, and “tun” shows tuning files.
11. Bank Selection
Selects a bank. “file” is the currently loaded file, “work” is the working bank, and “bank A-C” are static banks.
12. Lock Button
Locks loading into the bank. When enabled, pressing the load button will not change the “work” bank.
13. Write Button
Switches to write mode for files/banks. Overwrites patches when tapped.
14. To file Button
Saves the bank to a file.
15. Load Button
Loads a file into the “work” bank.
16. Copy bank Button
Copies data between banks.。
17. Undo/Redo Buttons
Executes undo or redo actions.
18. File Selection Button
Switches to file selection mode. In this mode, you can select files for copying to the clipboard or deletion.
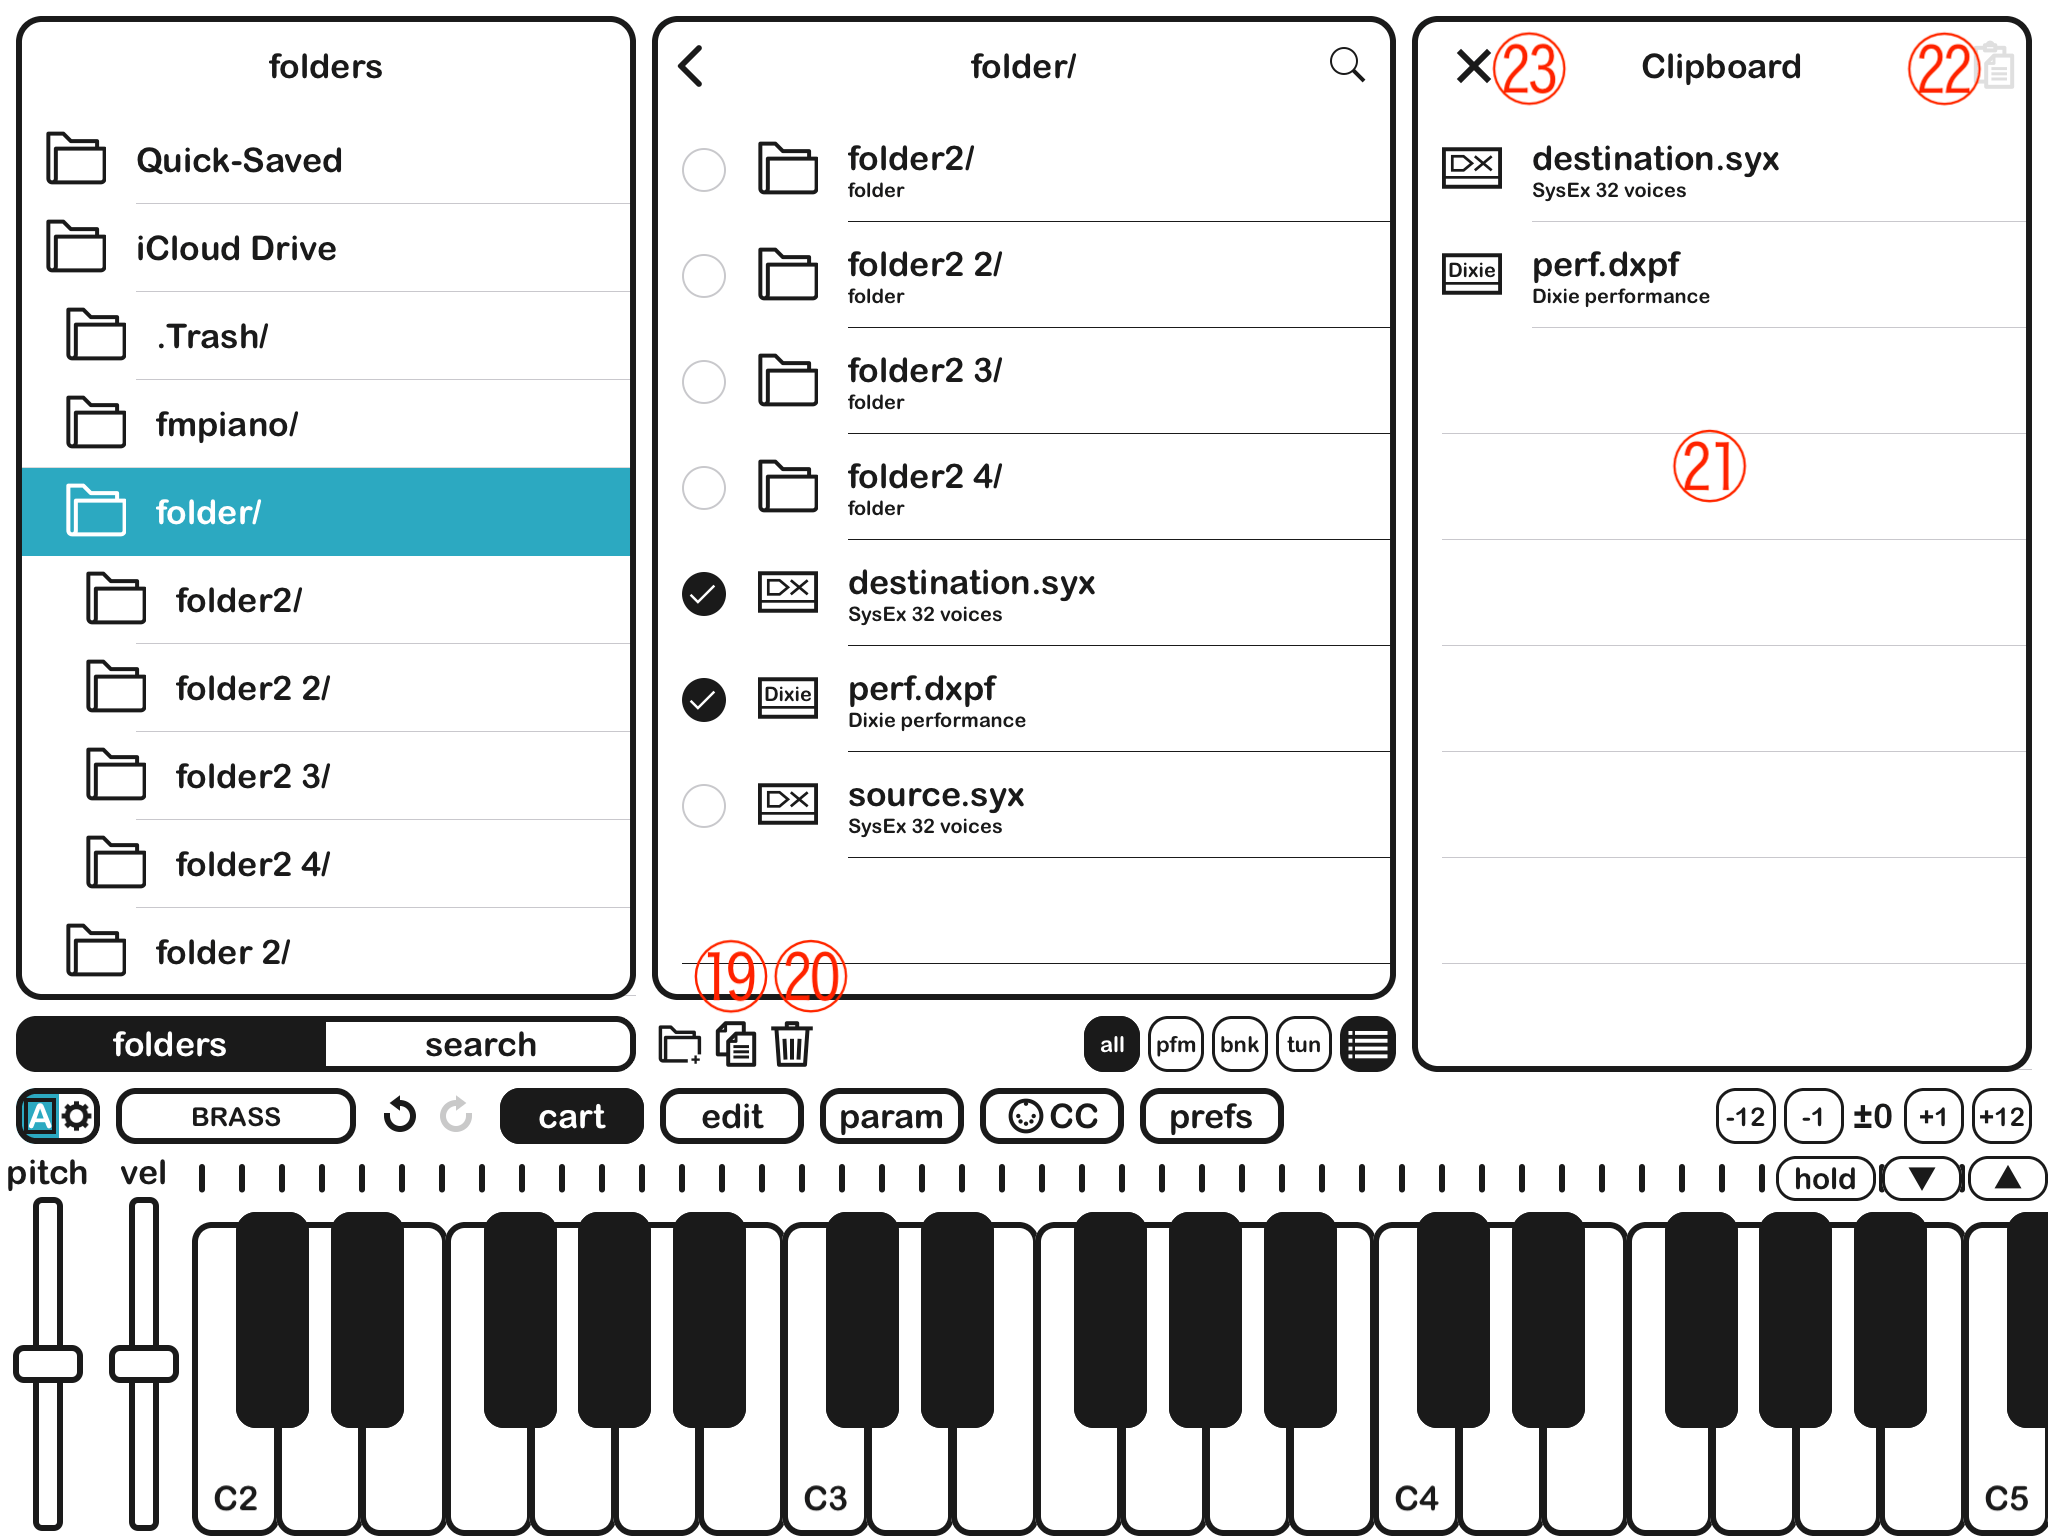
19. Copy Button
Copies the selected files to the clipboard.
20. Delete Button
Deletes the selected files.
21. Clipboard List
Displays a list of files in the clipboard. Swipe left to remove files from the clipboard.
22. Paste Button
Pastes files from the clipboard into the current folder. You can choose to copy or move them.
23. Close Button
Closes the clipboard. The contents of the clipboard will be cleared.
Patch Select Screen
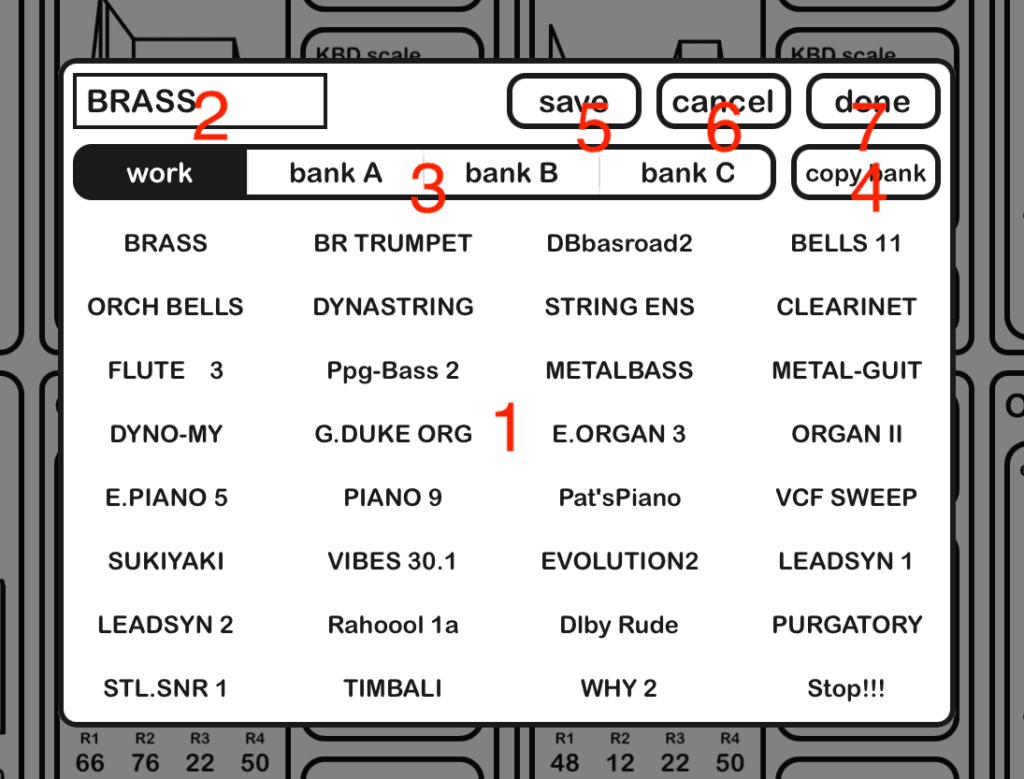
1. Tone List
A list of the currently loaded tones. Tap to switch the sound. When the store button is enabled, you can save the current tone in its place by tapping.
2. Tone name
You can set the name of the instrument. Special characters are not available for up to 10 characters.
3. Bank Select bar
Switches the banks.
4. Copy Bank button
Copies between the banks.
5. Save button
Enable when you save the instrument.
6. Cancel button
Restores the imported or saved sounds and closes this screen. Please note that if MIDI output is specified, the sound data of this application will be transmitted.
7. Done button
Close this screen.
Algorithm settings
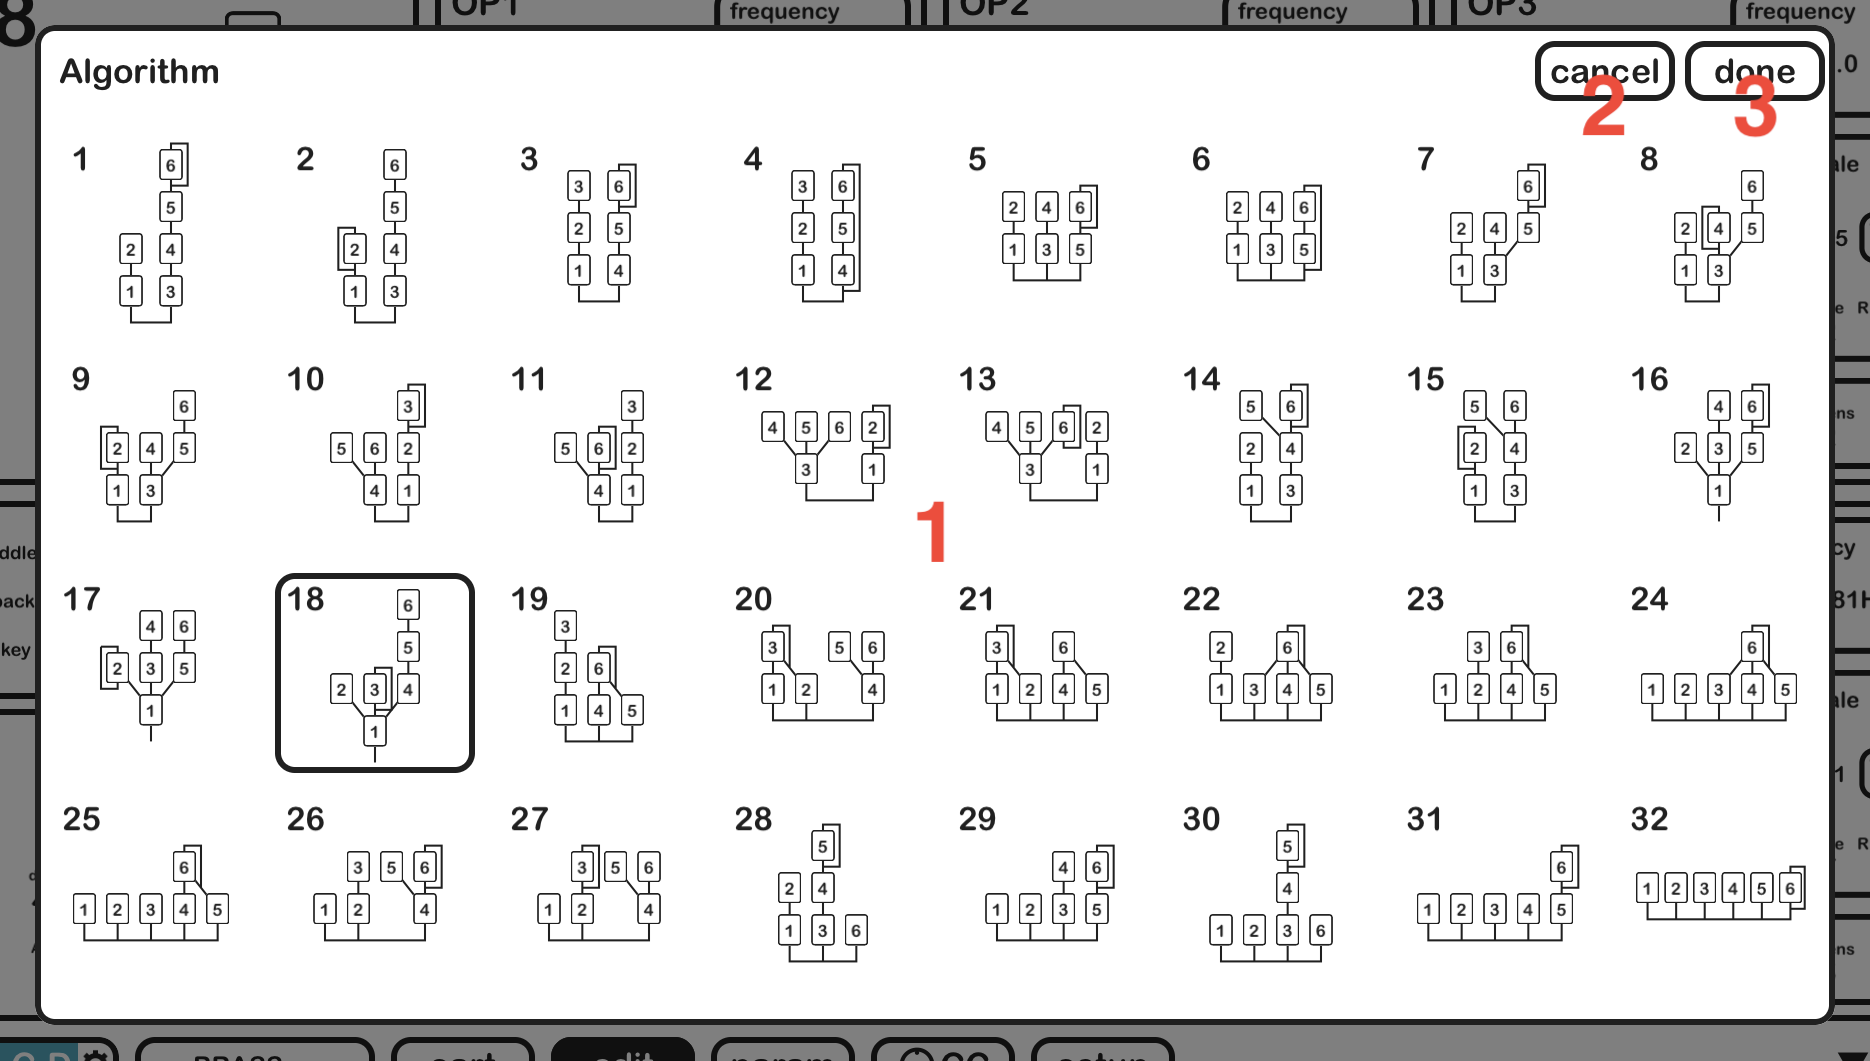
An algorithm is a way of connecting between operators. It is possible to make complex sound by selecting this.
1. List of algorithms
Select the algorithm.
2. Cancel button
Undo the changes and close this screen.
3. Done button
Close this screen.
Envelope Settings
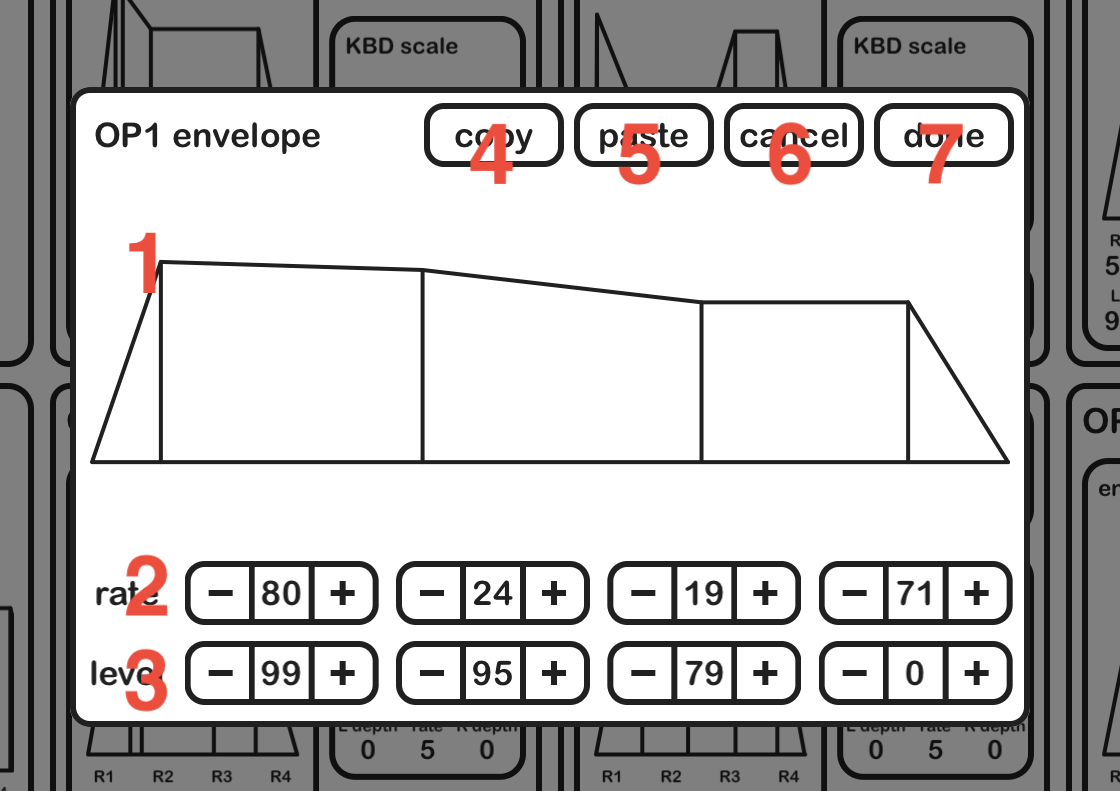
The envelope changes from level 4 to level 1 at the speed of rate 1 when the keyboard is pressed, then changes to Level 2 at rate 2 speed and changes to level 3 at rate 3 speed. When the keyboard is released, it changes to level 4 at rate 4 speed.
1. Envelope graph
The envelope’s diagram. You can change the value by dragging each point.
2. Rate
Represents the speed of the envelope change. Each value can be changed by pressing a button or dragging up or down.
3. Level
Represents the amount of each point in the envelope. Each value can be changed by pressing a button or dragging up or down.
4. Copy button
Used to copy values to other operators. Tap to save the value.
5. Paste button
Used to copy values from other operators. Tap to load the saved value with the Copy button.
6. Cancel button
Discard the changes and close the screen. Please note that if you specify MIDI output, the settings will be sent.
7. Done button
Close the screen.
Frequency setting
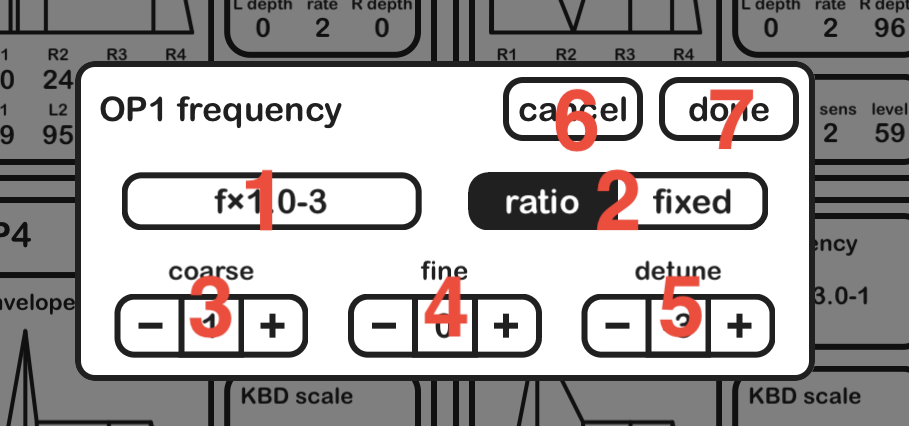
1. Frequency display
Displays the frequency of the operator. If the mode is ratio, it will appear like “f×1.0 + 4”. This means that the frequency is 1.0 times the given frequency and that the Detune is + 4. If the mode is fixed, it will appear like “100.0 Hz”.
2. Oscillation mode
Sets the oscillation mode of the operator.
In the case of ratio, the frequency changes according to the key pressed.
If fixed, the frequency is fixed regardless of the keyboard pressed.
3. Coarse
4. Fine
When the frequency is doubled, the pitch increases by one octave.
If the oscillation mode is ratio, the coarse can be set in the range from 0.5 to 31 times. In fine, it is 1 to 1.99 times.
When the oscillation mode is fixed, the coarse is set to 1Hz, 10Hz, 100Hz, 1000Hz, and fine to 1 to 9.772 times.
5. Detune
The oscillation frequency can be shifted from -7 to + 7 (de-tune).
6. Cancel button
Discard the changes and close the screen. Please note that if you specify MIDI output, the settings will be sent.
7. Done button
Close the screen.
Keyboard scale Settings
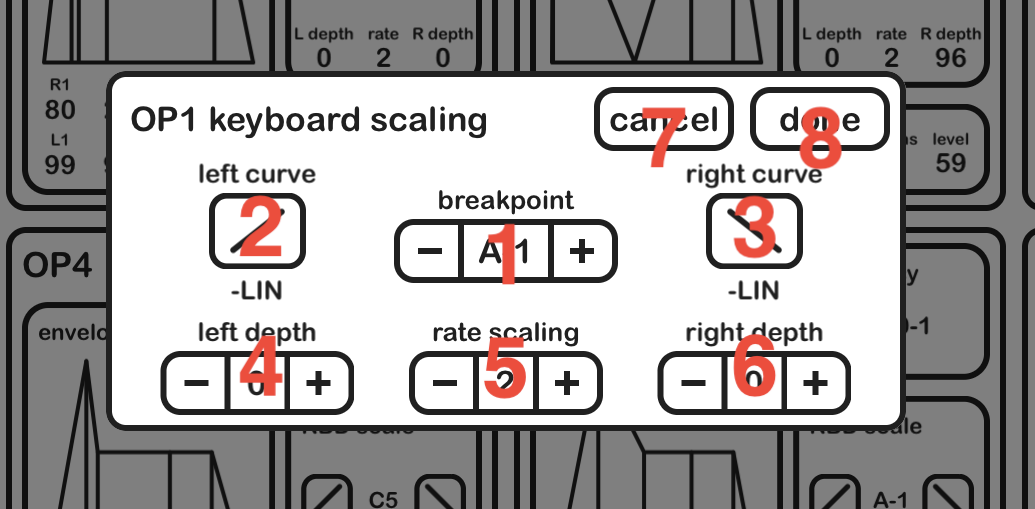
Depending on the keyboard you press, you can change the volume and the speed of the envelope.
1. Breakpoint
Decide which key is the center of keyboard scaling for each operator. Can be set in the range of A-1 to C8.
2. Rate Scaling
The operator’s EG rate can be faster as it becomes the treble part. For example, the treble can be set fast, like a piano.
3. Left curve
4. Right curve
Sets the curve of each of the left and right keyboard parts, centering on the breakpoint.
There are four types of curves: -LIN,-EXP, + EXP, + LIN.
5. Left depth
6. Right depth
Sets the depth of each curve in the range 0 to 99. 0 does not take effect and becomes the maximum depth in 99.
7. Cancel button
Discard the changes and close the screen. Please note that if you specify MIDI output, the settings will be sent.
8. Done button
Close the screen.
Sense/Level Settings
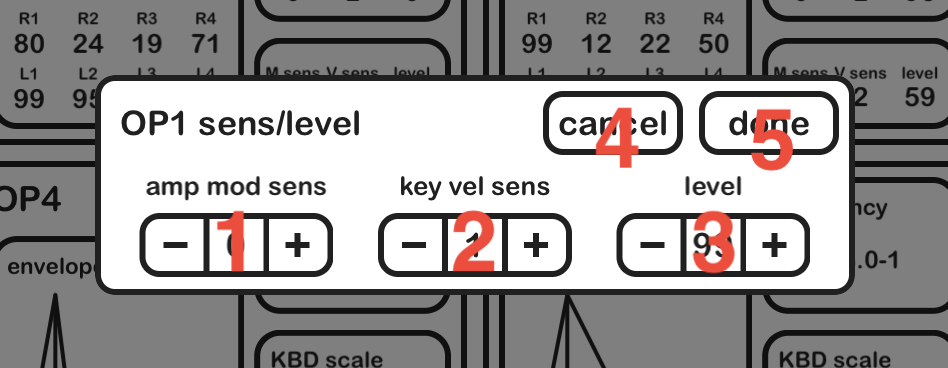
1. Amplitude modulation sensitivity (M sens)
Sets the sensitivity to control the volume in the LFO. In addition to the LFO setting AMD, it is affected when amplitude is enabled on the controller of the Param screen.
2. Key velocity sensitivity (V sens)
Sets sensitivity to the strength of the keyboard (velocity).
3. Output level
Set the output level for each operator.
4. Cancel button
Discard the changes and close the screen. Please note that if MIDI output is specified, the settings will be sent.
5. Done button
Close the screen.
Other settings
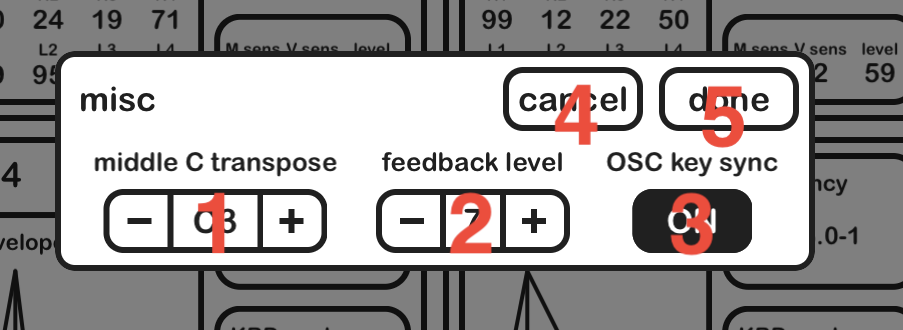
1. Middle C Transpose
You can set the transpose. Specifies a range of ± 2 octaves where the Central de (C3) is to be transposed.
2. Feedback level
Each algorithm has an operator that takes only one feedback. Set the amount of feedback in the range 0 to 7.
3. Oscillator key synchronization (OSC key Sync)
When on, the operator always oscillates from 0 to the phase. Therefore, when the keyboard is pressed, the sound becomes constant, but noise may occur. When off, the operator can smoothly connect to the previous sound. Therefore, the tone may change when the keyboard is pressed.
4. Cancel button
Discard the changes and close the screen. Please note that if MIDI output is specified, the settings will be sent.
5. Done button
Close the screen.
LFO Settings
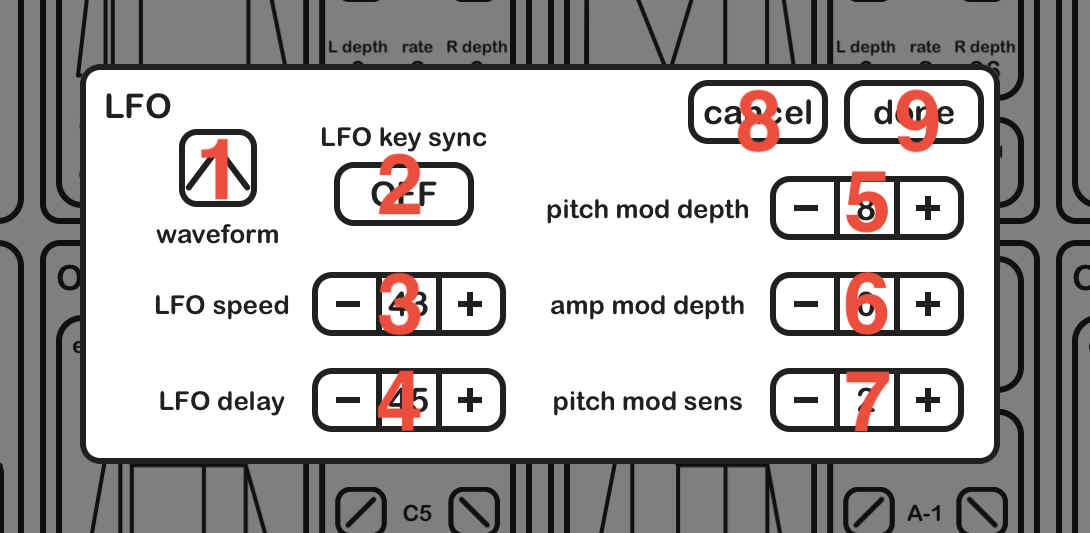
The low Frequency oscillator (LFO) is the one that oscillates at a low frequency and changes the pitch and volume of the sound.
1. Waveform
Select from 6 types of LFO waveforms. There are triangular wave (triangle), descending saw wave (saw down), Rose saw-up, square, square, sine wave (sine), sample & Hold.
2. LFO key Synchronization
When on, the LFO phase is reset when the keyboard is pressed. When off, the LFO phase has nothing to do with the keyboard.
3. LFO speed
Set the LFO speed in the range of 0 to 99. 0 is the slowest and 99 is the quickest setting.
4. LFO delay
After pressing the key, set the time before the LFO takes. Pressing the keyboard at 0 will take effect immediately. The longest time to take effect after pressing the keyboard in 99.
5. Pitch modulation Depth (PMD)
Sets the depth of the LFO to the interval in the range of 0 to 99. 0 does not take effect, and 99 is the most effective. PMD is a variation of the pitch, apart from the effect of each controller.
6. Amplitude modulation Depth (AMD)
Sets the depth of the LFO to the volume in the range of 0 to 99. 0 does not take effect, and 99 is the most effective. Apart from the effects of each controller, AMD changes the volume.
7. Pitch modulation sensitivity (PMS)
Sets the sensitivity of the LFO to the interval in the range of 0 to 7. In addition to PMD, it is affected when pitch is enabled on the controller of the Param screen.
8. Cancel button
Discard the changes and close the screen. Please note that if MIDI output is specified, the settings will be sent.
9. Done button
Close the screen.
Misc window (param)
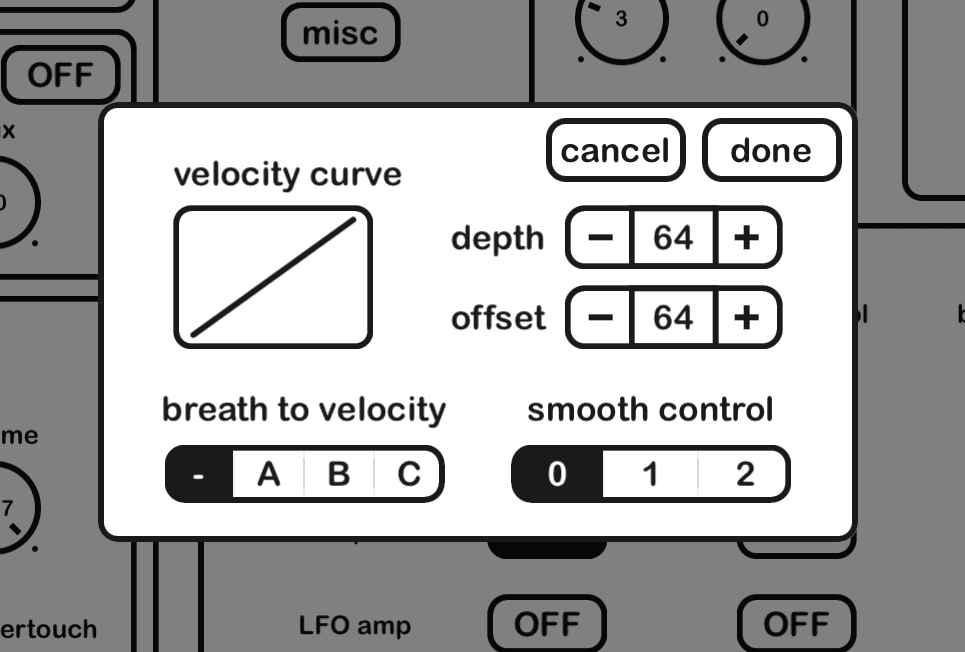
1. Velocity curve
The graph represents the current settings. Depth is a slope.
2. Breath to Velocity
Enable breath control on the patch which does not support EG bias by using the velocity settings. You can choose the mode A,B and C.
3. Smooth Control
Smoothen the controls. Slower response, lower digital noises.
About the Multiple-Out function
The “KQ Dixie Multi” Audio Unit can output each audio of each timbre separately when you use a host which supports multiple buses such as AUM and apeMatrix.
It is a useful function when 2 or more timbres you use.
The first Audio Unit bus contains all of the output. (Master)
Each bus from 2 to 17 contains the output of each timbre.
Mute the 1st bus for a use.
Recent Comments